|
|
As the Needles Click
All the latest news from Tabitha's Heart
September 2011

In the News
Finally Fall

Today, I saw my first fall leaf and the weather is cooling slightly.

And the I found the some spider lilies blooming. So it makes me think that fall is just around the corner.
 Of course, the temperatures are still above 80 and the azaleas are blooming to so I can't get too excited. Still, the hints of fall are in the air and naturally, my thoughts are turning to knitting. I thought in the next few issues I would recommend some patterns that make fantastic but quick-to-knit gifts. In the spirit of holiday knitting, I am offering a special holiday discount code. Just use the code TH-HolidayHeadStart to get a 50% discount on one single pattern. Discount will not work with the pattern collections.
Arwen's Elven Accessories

I am in the process of updating some of my older patterns to prepare for print sales. I am working first with the Arwen set. One thing I needed was a set of the pieces knit from the same yarn. My sweet friend Luciana kindly knit a new set of samples for me. Didn't she do a lovely job? Thanks Lu - you are the best.
The Arwen Elven Accessories set includes five patterns for the intermediate knitter - Arwen hat, Arwen cowl, Arwen keyhole scarf, Arwen slipper socks and Arwen fingerless gloves, which comes in two lengths (the long version is shown). This set of five patterns is a great bargain.
$10.50

Each of the patterns is also available individually through my pattern store.
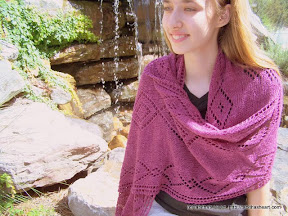
Debbie's Diamonds
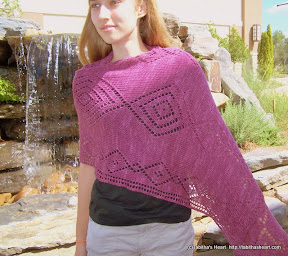
This shawl was designed for my friend Debbie of Dodge Creations. It features her lovely hand-dyed yarn. This rectangular shawl, featuring a bold diamond motif, will be a versatile wardrobe addition. It looks as fabulous with eveningwear as it does with jeans.
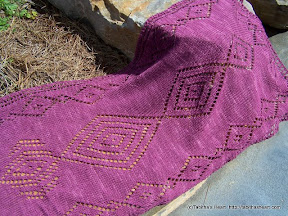
The shawl is knit in one piece using basic lace techniques. The pattern is fully charted (line-by-line written instructions are NOT included). Pattern is suitable for Intermediate to Advanced knitters. You will need to know basic lace techniques as well as chart reading. The pattern file is quite large (over 3Mb in size), so please contact me if you have trouble downloading it and I can send each page as a separate file.
 $7.00
$7.00
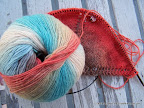 On the Needles
Red shawl
Another red shawl
Cream shawl (Are we noticing a theme here?)
A plethora of hats
Socks
A couple of mystery projects

Coming Next Month
Update on Fresh Designs: Shawls (I hope, I hope, I hope)
New hat pattern (and possibly several others)
A Bloggy Scavenger Hunt

Technique Talk
Long Tail Cast On
I started teaching a beginning knitting class this week, so I have been thinking a lot about basic techniques. Though not without its issues, the long tail cast on is probably the most commonly used knitting cast on. It is a little tricky at first but once you get the hang of it, the cast on is ridiculously fast and provides a very stable row from which to knit. I won't cover the actual process of working a long tail cast on since most of you probably know how to do it already, but if you aren't familiar with this one you can find a video at Knitting Help. What I thought I might cover are some common problems knitters have with the long tail cast on and how to overcome them.
-
Problem 1: Running out of tail yarn before enough stitches are cast on. This is probably the most frequent complaint about the long tail cast on. There are two rules of thumb for determining the length of the yarn tail you need to cast on. One school of thought is that you need approximately 3 times the width of the finished piece in yarn for the cast on; the other is that the tail needs to be approximately 1 in/2.5 cm long for each stitch that you need to cast on (or ). I find the second rule to work out without fail for worsted weight yarn, but this varies slightly when working with other yarn weights. For example, when using fingering weight, you will need closer to 0.5 - 0.75 in/1.25 - 1.9 cm of yarn for each stitch, so 1 yd/-0.9 m of yarn is generally enough yarn for casting on most socks. And for bulky or super bulky yarns, you might need slightly more than 1 in/2.5 cm per stitch; I would estimate 1.5 in/3.8 cm per stitch. As a safely precaution, if I am casting on a project with more than 100 stitches, I generally allow an extra 6 in/15 cm just to be sure I don't have to cast on twice. If you find yourself in a situation where you have calculated your yarn tail length carefully but still run out of yarn tail before you have enough stitches cast on, do not despair. You can always add the extra stitches "backwards." Turn your work around, as if you were ready to start knitting, and purl a stitch without dropping the old stitch from the needles. Now transfer the new stitch from the right needle back to the left needle. Purl the stitch you just placed on the left needle, without dropping it off the left needle, and transfer the new purl stitch onto the left needle - two stitches cast on. Repeat this process until you have cast on all the stitches you need.
-
Problem 2: Cast on is too tight. This one is the easiest problem to solve. If your cast on is too tight, it means that you got the stitches too close together in the cast on process. The normal inclination is to push each new cast on stitch against the last one as you proceed. This will result in an inflexible cast on that usually looks too small for the rest of the piece. To correct this, simply space your stitches out a bit. You should have as much space between each stitch as the yarn is wide. Below are two photos showing the long tail cast on. In the first photo, you see the correct spacing of stitches on the needle. I even carried the yarn tail to the top so you can see that the stitches are spaced a yarn-width apart. In the second photo, you see stitches that are crowded together. On the right end of the needle there are some stitches that are properly spaced for comparison.
 Proper spacing of cast on stitches
 Cast on stitches on end of needle are too tight
-
Problem 3: Stitches are still too tight. So, you tried spacing your stitches wider and the cast on is still too tight. Another solution, especially when working a pattern requiring you to cast on loosely, is to cast on over a larger needle or cast on over two needles held together. With the latter method, just slide out that second needle before beginning to work.
That covers the major complaints about the long tail cast on. I hope some of these tips will come in handy as you try it out for yourself.
|
Stash Enhancement
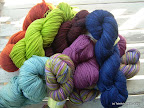
Dodge Creations Dye Works
My friend Debbie of Dodge Creations kindly provided the yarn for the Debbie's Diamonds design. I thoroughly enjoyed working with Debbie and her yarn, so I thought I would share this hidden gem with you. Dodge Creations Dye Works is a relatively new indie dyer based in Toronto, Canada. Currently, she offers a 100% superwash merino wool yarn base in three weights - fingering, DK and worsted weight. She dyes traditional hand-painted yarns as well as kettle-dyed semi-solids.
The yarn used in the Debbie's Diamonds Shawl is a kettle-dyed fingering weight yarn in the Plum Blossom colorway. The yarn itself is a good workhorse yarn. It isn't a luxury base but it isn't as pricey either or as fragile. The yarn is tightly twisted, not prone to splitting, and is soft and remarkably strong. This yarn took some serious abuse from me before the Debbie's Diamonds design was complete. It got ripped countless times without showing signs of wear, and bounced back beautifully when blocked. It works up wonderfullly at a lace gauge but stands up equally well to the much tighter sock gauge. It is a good all-purpose yarn. My only grievance was the yardage. This particular base comes in a 380 yd/327 m skein, which is a little bit short of the more common 400-425 yd/366 - 387 m quantity. This yardage can be problematic if you are knitting a pair of socks for long feet or with a long cuff. For some patterns, you may find you need an extra skein.
Now to talk about the fun part; the color. While Debbie dyes some lovely hand-paints, I generally gravatate toward semi-solids and tonals. I don't really like how limiting strongly variegated yarns can be to designing. The Plum Blossom colorway that I used was one of her kettle-dyed yarns. The color is unapologetically plum but in a rich and regal way and not of the brash neon type. The variations in color are subtle enough that they don't compete with the stitch pattern, but still give the final knitted piece amazing depth. I appreciated that the lightest spots in the color range varied in length and distance from one another. This prevented any unwanted color patterning. The transitions from light to dark and back again added fluidity to the shawl. It seems to give additional life to the design.
Like any hand-dyed yarn, there are color differences between one skein and the next, even when the skeins have been dyed together. Fortunately, it is fairly easy to avoid a line of color transition by blending two skeins together; working rows from alternating skeins as you approach the end of a skein. In other words, when you are approaching the end of the first skein, add the second skein of yarn and then work two rows from the second skein and two rows from the first until you reach the end of the first skein. Then continue knitting with the second skein. This will blend the yarn color so there isn't a transition line in your finished piece.
On the whole, Dodge Creations Dye Works is a good workhorse yarn at a budget-friendly price. She also ships her yarn pre-wound into lovely yarn cakes so you can start knitting immediately. Though she is in Canada, she does ship to all of North America. I was pleasantly surprised at how quickly I received my order. Do yourself a favor and check out Debbie's lovely colorways.
Disclaimer: Though Debbie generously supplied the yarn for my design, the opinions in this review are my own.
I give it a ♥♥♥♥ rating.
|

Book Shelf
 Mary Thomas's Knitting Book
This month, since I am teaching a couple of beginning knitting classes, I thought it might be good to review a book that both the beginner and the expert can find useful. "Mary Thomas's Knitting Book" by Mary Thomas is one of those "oldey but goody" type of knitting references. I purchased the book because it was recommended on Ravelry and it wasn't expensive. It was originally printed in 1938, so some of the language is a bit dated, for example, what we commonly call straight knitting needles she calls knitting pins, but it is still a great knitting reference. It begins with a brief history and some good information on knitting implements and yarn. She then launches into gauge, i.e. knitting tension. Her chapter on gauge and tension (which she differentiates) is alone worth the price of the book.
In the next several chapters, Thomas explains the basics of knitting, including hand positioning, basic stitches, cast ons and cast offs as well as an excellent chapter on increasing and decreasing to and how they influence shaping. Each step is illustrated with a black and white drawing. Even though they aren't color photos, the drawings clearly illustrate each step. I especially like her discussion of crossed and uncrossed knit stitches.
The next section of the book is dedicated to more advanced techniques - color knitting, loom knitting, beaded knitting, and embroidered knitting. Here, the black and white drawing are supplemented with a few black and white photos. The qualitiy of the photos isn't fantastic, but considering the age of the book, it is forgiveable. I found the section on weaving the yarn in colorwork particularly helpful.
Next, Thomas turns to garments and accessories. She dedicates two chapters to constructing garments. This is really handy information if you want to fit a sweater or design one of your own. She has an extensive chapter on Shetland shawls followed by chapters on gloves and socks. Her sock chapter has some unusual construction techniques that are handy to know.
Thomas's final chapter is called Knitting Hints where she covers everything from blocking to yarn, she seems to have missed the A and Z in her coverage. There is an excellent discussion of picking up dropped stitches and a fantastic section of repairing damaged knits. The book also includes an index so you can easily jump to the topic you need.
The most disappointing thing about the book is the quality of the book itself. The paper is a bit cheap and the binding isn't of the highest quality. It appears that the book is a reproduction of the original volume rather than an updated reprinting. As such, the text is a bit crowded and small but that is fairly common for books printed in the 30s and 40s. I could also have lived without the catalog of Dover books that make up the last 10 or so pages. I recommend putting a book mark at the index for quick reference.
The conclusion of the matter: Mary Thomas crams a lot of valuable information into a relatively short book. Though it isn't the fanciest book you will ever see, the information contained in it is well worth the modest investment. There is something every knitter will find useful in a book small enough to slide into a knitting bag.
I give it a ♥♥♥♥ rating.
|

What's Cooking?
Guilt-free Brownies
I found a quick and easy recipe on the Weight Watchers website for making brownies that weren't quite so pointy. This recipe used a packaged brownie mix so it is quick-to-make, but lightened up the recipe so that you could do more than look at the pan and drool. Since I know several of you are watching your weight, I thought I would share it with you. The original recipe called for baking the brownies in a mini-cupcake pan using 1 tablespoon of batter per cupcake. I went for the easier sheet cake pan instead.
-
One 21-ounce package of brownie mix, dry
-
1/2 cup water
-
1/2 cup unsweetened applesauce
-
2 egg whites, lightly beaten
Preheat oven to 350 degrees. Lightly spray the bottom of a 13 X 9 inch cake pan with non-stick baking spray. Combine all ingredients and mix for about 50 strokes (batter will be thoroughly wetted but still a bit lumpy). Pour batter into prepared pan. Yes, it will look really thin because you are controlling portion size as well as calorie content. Bake 10 - 12 minutes or until a tester inserted into the center of the brownies comes out clean. Allow to cool completely and slice into 36 brownies.
Each brownie will be 2 - 2.5 Points+ values. Point value will be more accurate if baked in mini-cupcake pan. Weight Watchers version also suggested dusting the tops with powdered sugar but I don't especially like powdery stuff on top of my food so I skipped that step.
|
Musings & Inspirations
Fall is a time of renewal for me. With the temperatures finally dropping out of the miserable upper-90s and with the holidays on the horizon, my creative energy really starts flowing. I have been sketching out loads of things lately. Some of these you won't see for a while because they are stealth projects, but you will be seeing some new things soon.
One of my favorite things about fall is waiting for my Confederate Rose to bloom. This year it is full of buds so I am hoping for a really spectacular show this year. Hopefully, nothing buggy will damage the blooms. They are certainly worth the wait.
|

From the Heart
Happenings at Heart House
The Heart household is getting ready for fall. We have gotten back into the swing of schooling and are loving the cooler weather. We haven't had to use the air conditioner in weeks. We have been enjoying some outdoor field trips. The kids are getting back into the archery routine too now that it is cool enough to breathe outdoors. With school and preparations for knitting class, we have been quite busy.
We did have a fun little adventure this week. The kids had gone out to feed the animals. Princess Buttercup rushed indoors yelling for me to come quick. I followed her outside to discover that a bird, a mourning dove, had managed to get trapped inside the chicken pen. The chickens weren't too happy about the situation, and neither was the dove. The kids were totally panicked about how to get the bird out of the pen. Mommy to the rescue. I put some vegetable scraps in one end of the pen to calm the chickens, opened the top of the pen near where the dove was and then backed away. She flew out quickly. I am pretty sure she cooed with gratitude as she flew away. The kids were surprised that the whole process took less than a minute. Ah, the joys of living on a farm. I am just thrilled that is wasn't a snake this time.
The Last Word
If you are still with me, thank you. I appreciate those of you who bravely wade through my verbosity. I hope you found something of value in this edition. If you have any suggestions for topics that you would like to see covered in future editions, please feel free to let me know. There is a feedback thread in my Ravelry group, you can comment on my Facebook wall, tweet me or even email me. I'd love to hear your comments. Until next month...
Happy knitting.
|
|
|
|
|
|
|