Jun 24, 2019 05:13 am
Halliday was 30 years old, and a captain in the Royal Marine Light Infantry, during the Boxer Rebellion in China when the following deed took place for which he was awarded the VC. 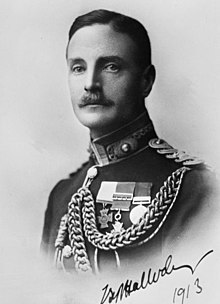 On 24 June 1900 at Peking, China, an attack was made on the British Legation by the Boxers who set fire to the stables and occupied some of the other buildings. It being imperative to drive the enemy out, a hole was knocked in the Legation wall and 20 men of the RMLI went in. Captain Halliday, leading a party of six men, was involved in desperate fighting and was severely wounded but despite his injuries, he killed four of the enemy. Finally, unable to carry on any further, he ordered his men to go on without him, after which he returned to the legation alone, telling his men 'carry on and not mind him', so as not to diminish the number of men engaged in the sortie. He walked 100 yards unaided to the hospital although his shoulder was half blown out and his left lung punctured. His citation reads: Captain (now Brevet Major) Lewis Stratford Tollemache Halliday, Royal Marine Light Infantry On the 24th June, 1900, the enemy, consisting of Boxers and Imperial troops, made a fierce attack on the west wall of the British Legation, setting fire to the West Gate of the south stable quarters, and taking cover in the buildings which adjoined the wall. The fire, which spread to part of the stables, and through which and the smoke a galling fire was kept up by the Imperial troops, was with difficulty extinguished, and as the presence of the enemy in the adjoining buildings was a grave danger to the Legation, a sortie was organised to drive them out. A hole was made in the Legation Wall, and Captain Halliday, in command of twenty Marines, led the way into the buildings and almost immediately engaged a party of the enemy. Before he could use his revolver, however, he was shot through the left shoulder, at point blank range, the bullet fracturing the shoulder and carrying away part of the lung. Notwithstanding the extremely severe nature of his wound, Captain Halliday killed three of his assailants, and telling his men to "carry on and not mind him," walked back unaided to the hospital, refusing escort and aid so as not to diminish the number of men engaged in the sortie. — London Gazette, 1 January 1901. He was promoted to brevet major for his part in the legation's defence, and returned to the United Kingdom to receive the VC from King Edward VII during an investiture at Marlborough House on 25 July 1901.
Read in browser »
   
Jun 19, 2019 07:51 am
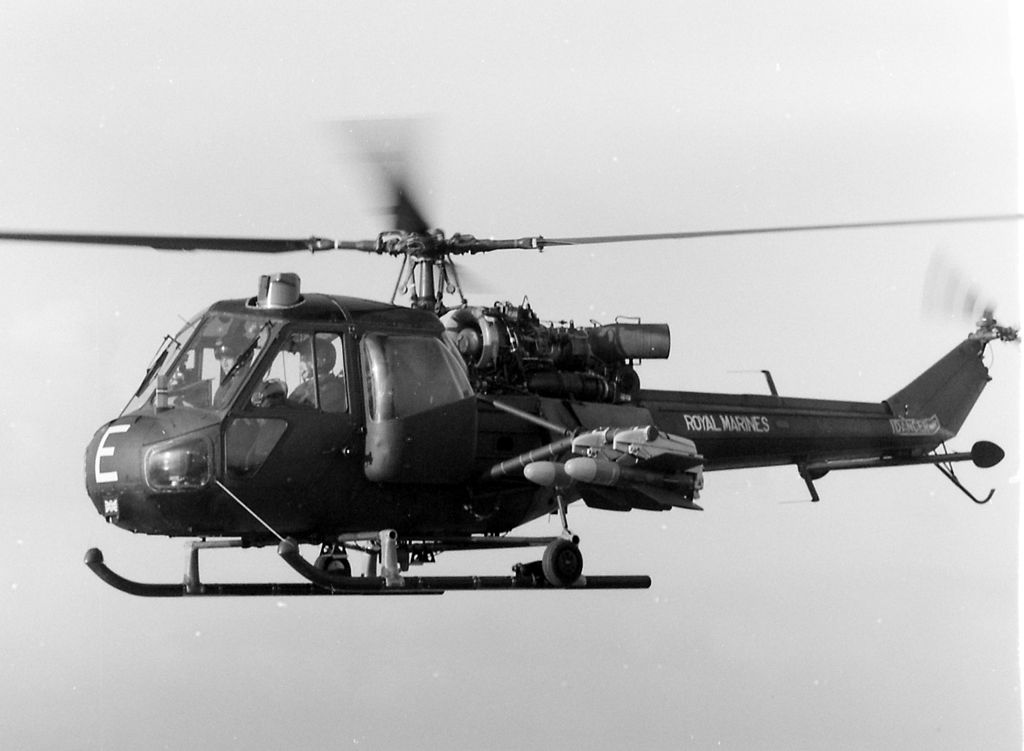
On 9th May 1982 two teams of SBS assaulted an Argentinean spy trawler the ARA Narwal that had been shadowing the British fleet. 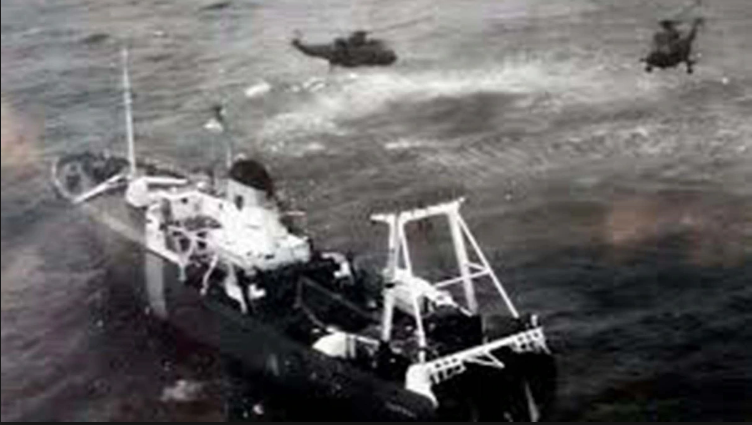 The ship had been damaged by bombs and cannon fire from an earlier attack by Navy Sea Harriers and was listing badly when the assault force arrived in 2 Seaking helicopters. Using techniques developed for maritime counter terrorism, the SBS assault team fast-roped onto the deck and quickly secured the ship without any shots fired. Along with the shaken crew, vital intelligence documents were also retrieved and flown back to the fleet. Meanwhile, an Aérospatiale SA 330 Puma of the Argentine Army was sent to recover the crew of Narwalafter receiving a distress signal, but was shot down by destroyer HMS Coventry with a Sea Dart missile, killing all three members of the crew. The vessel was taken in tow but sank the next morning. This was the first air-to-ship storming of a hostile vessel in military history. 
Read in browser »
Jun 17, 2019 03:28 am
17 June 1775: During the night of 16-17 June, the American rebels, tightening their grip on Boston, occupied and entrenched Breed’s Hill, overlooking the harbour. (Their orders specified the fortification of Bunker Hill, which was a little higher). Next day Major-General William Howe, commanding the 2,200-strong British force, counter-attacked.   He underestimated the tenacity of his opponents, and relied solely on shock action with the bayonet. Ordered to advance with unloaded muskets, the British sustained needlessly heavy losses. The Americans, behind entrenchments, rail fences and stone walls, repulsed two assaults, but their ammunition supply failed during the third assault and they were driven off the hill. 1,054 British troops were killed or wounded. Although the engagement left the local situation unchanged, the fact that the Americans had made so determined a stand against regular troops provided a boost to their morale On the left flank of the British, the houses of Charlestown were in flames. The 2nd Marine battalion took part in the Battle of Bunker Hill. Major Pitcairn was commander of the final assault on Colonel Prescott's redoubt. In the summer heat he led his Marines, including his son Thomas, (a Lieutenant aged 19), on foot up the hill for the final assault.  The Marines at the Battle of Bunker Hill - David Rowlands While advancing, they marched through another line of infantry who were being pushed back by heavy rebel fire. Pitcairn told them to "Break and let the Marines through!", and is said to have threatened to "bayonet the buggers" if they would not get out of the Marines' way!  He waved his sword and urged his men on: "Now, for the glory of the Marines!"A musket ball struck Major Pitcairn in the breast and he fell into the arms of his son Thomas. According to one story, the rebel troops were near defeat, when Major Pitcairn ordered them to surrender. An American then stepped forward and shot Pitcairn. The British were temporarily stunned, and the Americans were able to retreat. Another story tells that the major fell dead just as he was shouting to his men, “The day is ours.”Pitcairn's son carried his wounded father out of the line of fire to the water's edge, before returning to the battle. "I have lost my father!" he said. "We have all lost a father!" some of the Marines responded. A boat took Pitcairn back to Boston, where he was put to bed in a house on Prince Street. Although the bullet was removed and his wound dressed, he died a couple of hours later. He was 52. The fatal musket ball and his uniform buttons were returned to his wife and children. The Death of Major John Pitcairn - Wood Engraving As the Americans’ ammunition expired, their firing sputtered and “went out like an old candle,” wrote William Prescott, who commanded the hilltop redoubt. His men resorted to throwing rocks, then swung their muskets at the bayonet-wielding British pouring over the rampart. “Nothing could be more shocking than the carnage that followed the storming [of] this work,” wrote a royal marine. “We tumbled over the dead to get at the living,” with “soldiers stabbing some and dashing out the brains of others.” The surviving defenders fled, bringing the battle to an end. In just two hours of fighting, 1,054 British soldiers—almost half of all those engaged—had been killed or wounded, including many officers. American losses totaled over 400. The first true battle of the Revolutionary War was to prove the bloodiest of the entire conflict. Though the British had achieved their aim in capturing the hill, it was a truly Pyrrhic victory. “The success is too dearly bought,” wrote Gen. William Howe, who lost every member of his staff (as well as the bottle of wine his servant carried into battle). More here:
Read in browser »
Jun 14, 2019 06:06 am
At 2100 hours on 14 June 1982, the commander of the Argentine garrison in Stanley, General Mario Menéndez, surrendered to the Major General Jeremy Moore. The surrender was in conflict with the Argentine Army code stating that a surrender was illegal unless more than 50% of the men were casualties and 75% of the ammunition was spent. The terms of the surrender document were slightly changed after negotiation by General Menéndez. The phrase unconditional surrender was changed for the term surrender. The Argentines were granted: The Argentines units will retain their flags.The units will remain under control of their respective officersThe surrender ceremony will be private (not public)The Argentine officers will retain their sidearms.The final point about the returning of the 11,313 prisoners of war in their own ships was not accepted and 4,167 of them were repatriated to Argentina on the ocean liner Canberra alone. The junta had falsely claimed that the liner had been crippled during the Battle of San Carlos. The surrender document is on display at the Imperial War Museum in London.  As noted in the museum, the time of surrender was backdated three hours in order that both Zulu time (UTC) and the local time were recorded as 14 June even though technically it was already 15 June in London, in order to prevent possible confusion by Argentine troops who might have mistakenly thought that they were permitted to keep fighting until the next day, 15 June 1982: Headquarters, Land Forces Falkland Islands INSTRUMENT OF SURRENDER I, the undersigned, Commander of all the Argentine land, sea and air forces in the Falkland Islands [Menéndez's signature, scribbled over the crossed-out word of "unconditionally"] surrender to Major General J.J. MOORE CB OBE MC* as representative of Her Britannic Majesty's Government. Under the terms of this surrender all Argentine personnel in the Falkland Islands are to muster at assembly points which will be nominated by General Moore and hand over their arms, ammunition, and all other weapons and warlike equipment as directed by General Moore or appropriate British officers acting on his behalf. Following the surrender all personnel of the Argentinian Forces will be treated with honour in accordance with the conditions set out in the Geneva Convention of 1949. They will obey any directions concerning movement and in connection with accommodation. This surrender is to be effective from 2359 hours ZULU on 14 June (2059 hours local) and includes those Argentine Forces presently deployed in and around Port Stanley, those others on East Falkland, (Menendez's signature) West Falkland and all outlying islands. [Menéndez's signature] Commander Argentine Forces [Moore's signature] J. J. MOORE Major General [Pennicott's signature] Witness 2359 hours 14 June 1982 
Read in browser »
Jun 12, 2019 06:37 am
Following K Coy's helicopter flight forward on to Mount Kent over the night of Sunday 30th May to join D Sqn SAS, the rest of 42 Cdo moved to Mount Challenger during that week, and were eventually joined by K Coy. From there, they pushed out a troop strength observation post to Wall Mountain, and planned for an attack on the heavily defended Mount Harriet. An advance direct from Wall Mountain across minefields and into Argentine machine guns, was out of the question, and a left flanking move would risk overlapping 45 Cdo's assault on Two Sisters. Lt Col Vaux therefore decided on a right hook taking him well south of the more northerly Fitzroy/Stanley track to come up behind the Argentines from the south east. Finding an approach route through the extensive minefields and pinpointing enemy positions on this side of Mount Harriet called for careful patrolling, and for his part in this, Sgt Collins was decorated. And, as in the other battles and the approaches to them, men of the Royal Engineers played a key role in dealing with the minefields. 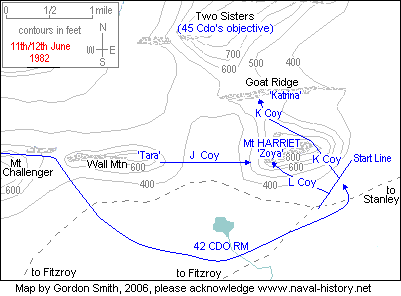 The final plan was to leave J Coy on Wall Mountain ('Tara') both as a reserve and to create a diversion, and for K and L Coys to march from the western end of Wall Mountain and across the Fitzroy/Stanley track before swinging east and then up to the start line behind Mount Harriet ('Zoya'). Moving off at 8.30 pm, K Coy was to attack the eastern end, and an hour later, L Coy the western end, after which 42 Cdo would move on to take Goat Ridge ('Katrina'). Unlike the other two attacks, this one was 'noisy' with Mount Harriet receiving a preliminary bombardment as part of the diversion plan. On Friday 11th, as 42 Cdo prepared to move off, Argentine shellfire killed one of the Marines on Wall Mountain. Later, K and L Coys started off from Mount Challenger, with one of J Coy's Troops going ahead to mark the route and drop off Milan sections, including one on the Stanley track in case any of the Argentine Panhard armoured cars should appear. They were also due to meet up with a Welsh Guards patrol assigned to secure 42 Cdo's start line. But there was a delay and H-hour held up, although J Coy went ahead and opened fire from Wall Mountain to simulate a large scale clash. 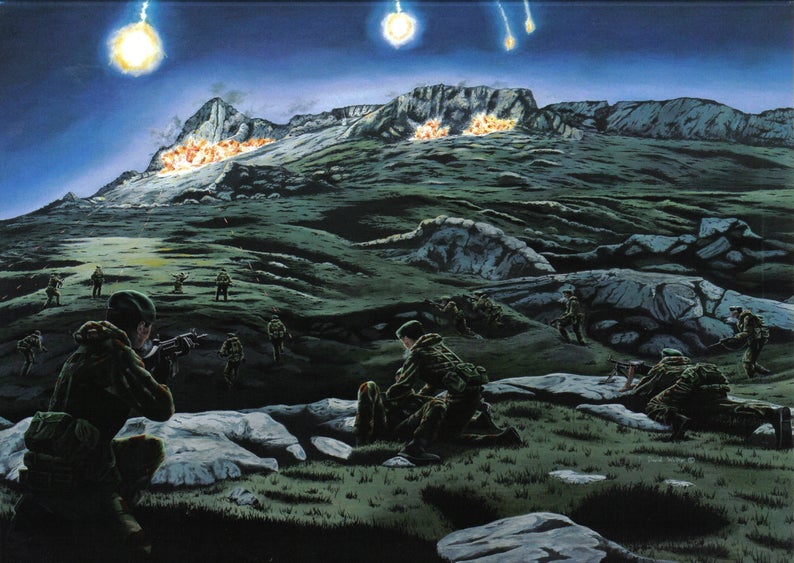 Battle for Mount Harriet - K Coy crossed the start line at 10.00 pm, and almost reached the Argentine positions without being spotted. On the left, 1 Troop engaged the first enemy, and 2 Troop to the right went ahead to start clearing their part of K Coy's objective during which time 42 Cdo suffered its only fatal casualty of the night. 3 Troop now passed through 2 Troop on to the summit, and with 1 Troop below them to the south, started to work their way westwards bunker-by-bunker, but were held up by machine gun fire. It was at this time that three K Coy Corporals - Newland of 1 Troop and Eccles and Ward of 3 Troop - won the Military Medal for taking the enemy position. While K Coy was fighting on the eastern end of the summit and coming under artillery fire, L Coy was making its way up towards the western end of Mount Harriet under heavy machine gun fire which opened up soon after they crossed the start line. Milans were successful in knocking out these and other enemy sniper positions, but it took a number of hours and casualties from artillery, before L Coy's half of the summit was taken, still in the dark. 5 Troop was then sent forward to the next objective just to the north of the summit, but was initially held up until the enemy resistance crumbled under mortar and artillery fire. With dawn and L Coy still fighting forward, K Coy was ordered on to Goat Ridge, by which time J Coy had moved directly across from Wall Mountain to join in the final securing of Mount Harriet, running through a minefield on the way. In successfully taking its objective, 42 Cdo had lost just one man killed. British Gallantry Awards Approach to* and Battle for Mount Harriet by 42 Cdo RM Lt Col N F Vaux (DSO) RM Capt P M Babbington (MC) RM, K Coy Sgt M Collins (MM) RM, K Coy * Cpl M Eccles (MM) RM, K Coy Cpl S C Newland (MM) RM, K Coy Cpl C N H Ward (MM) RM, K Coy
Read in browser »
Jun 12, 2019 06:12 am
45 Cdo's yomp from San Carlos Water via Teal Inlet ended to the west of Mount Kent on Friday 4th, and the next week was spent patrolling towards Two Sisters, leading to a number of bloody clashes with the Argentines. On their second patrol, Lt Fox's Recon Troop reached the end of Two Sisters, and when discovered, fought their way out killing up to thirteen of the enemy without loss. Later, Lt Stewart of X Coy broke out in a similar action, and by around Tuesday 8th, 45 Cdo had reconnoitred the main Argentine positions towards the western end. Then over the next two days, Sgt Wassell and other men of the M & AW Cadre completed the picture by covering the eastern end and the ground between Two Sisters, Mount Harriet and Tumbledown Mountain,including Goat Ridge. Sadly these successes did not come without loss. Over Thursday night a Y Coy patrol accidentally fired on a supporting mortar group killing four men. 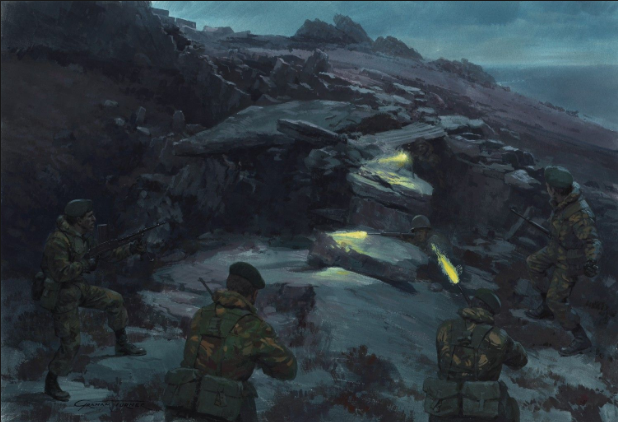 45 Cdo's night attack would also be silent without any preliminary artillery fire. Lt Col Whitehead's plan was for X Coy to leave their start line at 9.00 pm, and having taken the south west peak ('Long Toenail') around two hours later, to set up a fire support base that included 40 Cdo's Milan Troop. Z Coy would then assault the western part of the north east peak ('Summer Days'), and Y Coy the eastern part. On Friday 11th, 45 Cdo less X Coy left their positions behind Mount Kent and moving around the north side, reached the main start line ('Pub Garden') as planned. Meanwhile X Coy, marching down between Mount's Kent and Challenger and heavily weighed down, especially by the Milans, arrived at the start line over two hours late. After a short rest, they began their move towards 'Long Toenail' at 11.00 pm.  Battle for Two Sisters - X Coy headed across the open ground towards 'Long Toenail' led by 1 Troop, and less than a mile short of the peak, 3 Troop took over the lead, but half way up was stopped by heavy machine gun fire and temporarily pulled back. The enemy positions were hit by Milans and some mortar fire, and now 2 Troop pushed on to the summit under artillery fire. Reaching there, they were forced back by more shellfire, but shortly returned driving off the Argentine machine gunners. Soon after midnight as X Coy continued its fight for 'Long Toenail', Z Coy followed by Y Coy to their right, moved off from 'Pub Garden' on their silent uphill approach. As the Argentines were still distracted by X Coy's attack, the other two companies went to ground until a flare near Z Coy led to the right hand 8 Troop opening fire. The return enemy fire including artillery and mortars was so heavy, killing four men, that Lt Dytor led his men of 8 Troop forward in a charge towards the summit, followed by 7 Troop in a firefight that still left them short of their objective. On their right, Y Coy swung further right to come up alongside them, managing to knock out some of the machine guns holding up Z Coy. 8 Troop was then able to advance towards the top covered by 7 Troop, and went on to clear the enemy positions on the southern side of their objective, while 7 Troop went on to do the same on the northern side. Two and a half hours after crossing the start line, Z Coy had taken the western part of 'Summer Days'. During this time, 9 Troop stayed back in reserve after suffering casualties from the mortars and artillery. Y Coy now moved between the Two Sisters peaks and below Z Coy's 8 Troop, and headed for the eastern part of the north east summit under heavy fire. Pushing on, and again using anti-armour weapons against enemy positions, all of Two Sisters was in 45 Cdo's hands before dawn. As they reorganized and dug in, heavy Argentine shelling started. Lt Col Whitehead prepared to move ahead towards Tumbledown Mountain, but was stopped by Brigadier Thompson. 45 Cdo had now taken one of the main Argentine defenses for the loss of the three Marines and a Sapper of the Royal Engineers killed by shellfire and mortars. British Gallantry Awards Approach to* and Battle for Two Sisters by 45 Cdo RM Lt Col A F Whitehead (DSO) RM Lt C I Dytor (MC) RM, Z Coy Lt C Fox (MC) RM, Recon Troop * Lt D J Stewart (MC) RM, X Coy * Cpl J Burdett (DCM) RM, Z Coy Cpl A R Bishop (MM) RM Cpl D Hunt (MM) RM, Z Coy Mne G W Marshall (MM) RM * Cpl H Siddall (MM) RM, Y Coy Bmdr E M Holt (MM) RA, FOO Party, 29 Cdo Regt RA Sgt J D Wassel (MM) RM, M&AW Cadre * (citation includes other patrols)
Read in browser »
Jun 08, 2019 01:50 pm
 Image F4 conducting a work up excercise in English Bay Ascension Island With the British Army’s 5 Brigade separated from their vital communications vehicles back at Goose Green, F4 under the command of C/Sgt Brian Johnston was been dispatched in poorly charted waters and under significant threat of air attack.  In a remarkable feat of pilotage, in darkness and without modern navigational aids, Brian Johnston reached Goose Green in good order and loaded the vehicles  At approximately 14:00 local time on the 8th June the ships RFA Sir Tristram and RFA Sir Galahad were badly damaged by a first wave of five A-4Bs Skyhawk aircraft. At 16:50 a second wave, composed of four A-4Bs Skyhawks hit and sank F4 a Landing Craft Utility from HMS Fearless in Choiseul Sound. The LCU was ferrying the vehicles of the 5th Brigade's headquarters from Darwin to Bluff Cove. Six Royal Marines went down with the vessel. However, the Sea Harrier combat air patrol was already on scene and responded; three Skyhawks were shot down and their pilots and a fourth damaged. All but two of LCU F4’s crew were killed during this action; C/Sgt Johnston, Sergeant R J Rotherham, Marine A J Rundle Marine R D Griffin. Mechanical Engineering Artificer (Propulsion) A S James, Leading Marine Engineer (Mechanical) D Miller,  This Image from https://www.palacebarracksmemorialgarden.co.uk/hms-fearless-lcu-sunk-8thy-june-1982-falkland-islands/
Read in browser »
Jun 07, 2019 06:23 am
The Battle of Port-en-Bessin also known as Operation Auberytook place from 7–8 June 1944, at a small fishing harbour west of Arromanches during the Normandy landings of World War II. The village was between Omaha Beach to the west in the U.S. V Corps sector, and Gold Beach to the east in the British XXX Corps sector. An objective during Operation Overlord, the fortified port was captured by No. 47 (Royal Marine) Commando of the 4th Special Service Brigade.  The main defences of Port-en-Bessin were on 200-foot (61 m) high cliffs known as the Western and Eastern features, either side of the hollow in which the port lay. An entrenched and concreted position had been built just south of the port on the Bayeux road, with more defences in the harbour.  Before the wireless was repaired to arrange covering fire, the Marines began a house-to-house battle through the port. The defensive position on the Bayeux road was charged and quickly overcome and its occupants captured. In the afternoon, after a bombardment by HMS Emerald and three squadrons of Typhoons firing RP-3 rockets, the cliff-top strong points were attacked and the base of the western feature captured. A troop advanced on the eastern feature against rifle and machine-gun fire and grenades being thrown down the open slope, which was also mined and had hidden flame-throwers. When the Marines were well up the slope, two FLAK ships in the harbour opened fire, killing twelve and wounding 17 men, more than half the troop in a few minutes, forcing it to withdraw.  German counter-attacks overran the Commando rear headquarters and an attack across the Escures–Port-en-Bessin road cut off the troop defending Escures. The strength of the commando in the port was reduced to 280 men, many of whom were wounded but an ammunition shortage was alleviated by several members of 522 Company Royal Army Service Corps, who drove supplies through German machine-gun and tank fire. The German defences in the harbour area consisted of dispersed strong points, which the marines attacked individually and gradually cleared the harbour in a series of costly attacks. The FLAK ships continued to fire and ammunition ran low.  Marine Captain Cousins led reconnaissance patrol towards the eastern feature and found an undefended zig-zag path up to the fortifications at the top. With darkness falling Cousins led a party of four officers and 25 men up the hill unobserved and surprised the defenders, who were thrown into confusion. The Marines then encountered a concrete bunker, which Cousins and four men rushed. Cousins was killed by a grenade and the men accompanying him were wounded but the German bunker was captured. Outnumbered four to one by the Germans, they fought their way up the feature through the concrete, entrenchments, mines and barbed wire defences. The German positions were captured one-by-one and before dawn the eastern feature had been occupied. The fall of the Eastern Feature persuaded the remaining Germans on the Western Feature to surrender. Capt Terry Cousins was nominated for the Victoria Cross for his leadership, courage and initiative but was declined much to the Commandos' disgust.The Commandos re-occupied Escures and at 4:00 a.m. on 8 June, the garrison commander and 300 men surrendered. By 8 June, 47 Commando had been reduced to a strength of c. 200 officers and other ranks. The battalion was ordered to move into the area of Douvres-la-Délivrande and were then ordered to move east of the Orne River to reinforce the British 6th Airborne Division. Lieutenant-General Sir Brian G. Horrocks, commander of XXX Corps towards the end of the Normandy Campaign, wrote of 47 Royal Marine Commando’s capture of Port-en-Bessin: "It is doubtful whether, in their long, distinguished history, the marines have ever achieved anything finer." Sir Robert Bruce Lockhart, historian and Director General of the British Political Warfare Executive during World War II, described 47 RM Commando’s performance as: "The most spectacular of all commando exploits during the actual invasion." Julian Thompson wrote: "In my opinion the operation by 47 RM Commando at Port-en-Bessin was one of the great feats of arms of any unit, Royal Marines, Army, Navy or Air Force of any nation in the Second World War."  The next day soldiers from the 16th (US) Infantry Regiment who had landed at Omaha Beach on D-Day moved toward Port-en-Bessin and eventually linked up with 47 Commando, joining together the British and American beaches. The major American PLUTO terminal would be located at Cherbourg, however the town would not be finally captured until 30 June, so Port-en-Bessin would play an important role in supplying the allied army fighting in Normandy. The 47th (Royal Marine) Commando had 136 casualties, 46 killed and 70 wounded.
Read in browser »
Jun 06, 2019 06:24 am
 The Battle of Normandy, which lasted from June 1944 to August 1944, resulted in the Allied liberation of Western Europe from Nazi Germany’s control. Codenamed Operation Overlord, the battle began on June 6, 1944, also known as D-Day, when some 156,000 American, British and Canadian forces landed on five beaches along a 50-mile stretch of the heavily fortified coast of France’s Normandy region. The invasion was one of the largest amphibious military assaults in history and required extensive planning. Prior to D-Day, the Allies conducted a large-scale deception campaign designed to mislead the Germans about the intended invasion target. By late August 1944, all of northern France had been liberated, and by the following spring the Allies had defeated the Germans. The Normandy landings have been called the beginning of the end of war in Europe. D-DAY LANDINGS: JUNE 6, 1944 By dawn on June 6, thousands of paratroopers and glider troops were already on the ground behind enemy lines, securing bridges and exit roads. The amphibious invasions began at 6:30 a.m. The British and Canadians overcame light opposition to capture beaches codenamed Gold, Juno and Sword, as did the Americans at Utah Beach. U.S. forces faced heavy resistance at Omaha Beach, where there were over 2,000 American casualties. However, by day’s end, approximately 156,000 Allied troops had successfully stormed Normandy’s beaches.According to some estimates, more than 4,000 Allied troops lost their lives in the D-Day invasion, with thousands more wounded or missing.  Less than a week later, on June 11, the beaches were fully secured and over 326,000 troops, more than 50,000 vehicles and some 100,000 tons of equipment had landed at Normandy. For their part, the Germans suffered from confusion in the ranks and the absence of celebrated commander Rommel, who was away on leave. At first, Hitler, believing the invasion was a feint designed to distract the Germans from a coming attack north of the Seine River, refused to release nearby divisions to join the counterattack. Reinforcements had to be called from further afield, causing delays. He also hesitated in calling for armored divisions to help in the defense. Moreover, the Germans were hampered by effective Allied air support, which took out many key bridges and forced the Germans to take long detours, as well as efficient Allied naval support, which helped protect advancing Allied troops.  In the ensuing weeks, the Allies fought their way across the Normandy countryside in the face of determined German resistance, as well as a dense landscape of marshes and hedgerows. By the end of June, the Allies had seized the vital port of Cherbourg, landed approximately 850,000 men and 150,000 vehicles in Normandy, and were poised to continue their march across France.
Read in browser »
Jun 01, 2019 04:49 am
 Lieutenant Richard James Nunn, Royal Marines, 3 Commando Brigade Air Squadron was killed when his Scout helicopter came under attack by an Argentine Pucara aircraft as he set off from Camilla Creek House to evacuate the Commanding Officer 2 PARA, wrongly then still thought to be alive, during the battle for Goose Green. His co-pilot was severely injured when the helicopter crashed nearby. Richard Nunn was posthumously awarded the Distinguished Flying Cross for his actions in support of 2 PARA during the battle for Goose Green. His citation records: "On Friday 28th May 1982 the 2nd Battalion The Parachute Regiment was engaged in fierce fighting to take enemy positions in the area of Port Darwin. From dawn, Lieutenant Nunn, a Scout helicopter pilot, had supported the Battalion flying vital ammunition forward to the front line and had evacuated casualties heedless of enemy ground fire. After flying continuously for three and a half hours, it was learnt that the Commanding Officer and others in Battalion Tactical Headquarters forward had been severely wounded. Lieutenant Nunn was tasked to evacuate these casualties collecting the Battalion Second in Command en route. However, five minutes after take off, suddenly and without prior warning, two Pucara aircraft appeared from the South and attacked the Scout with rockets and cannon fire. By great skill Lieutenant Nunn evaded the first attack but on the second his aircraft was hit and destroyed. Lieutenant Nunn was killed instantly and his aircrewman Sergeant Belcher was grieviously wounded. Lieutenant Nunn displayed exceptional courage, flying skill and complete devotion to duty in the face of the enemy. His achievements that day, supporting the Battalion, were exceptional and were instrumental in the eventual victory." 
Read in browser »
|


